
Custom PCB Cost: What Affects Pricing and How to Save
Custom PCB cost can vary widely — from less than a dollar for simple prototypes to several thousand dollars for advanced, high-layer industrial boards. The final price depends less on a single factor and more on a combination of design decisions, material choices, and production requirements.
Whether you’re validating a prototype or preparing for mass production, understanding these cost drivers helps you plan more accurately and avoid unnecessary spending.
5 Key Factors That Influence Custom PCB Cost
1. Layer Count
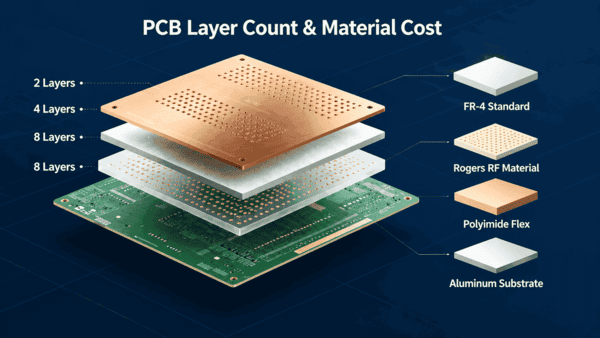
More layers mean more material, more lamination cycles, and more processing steps. Going from 2 to 4 layers roughly doubles fabrication cost; 4 to 8 layers can triple it. Always challenge your layer count early — many 4-layer designs can be re-routed on 2 layers with careful planning.
2. Board Size and Material
Larger boards use more raw material and produce fewer units per production panel. Standard FR-4 is the most cost-efficient substrate for most applications. Specialty materials — Rogers for RF, polyimide for flex, aluminum for high-power LED — cost 3–20× more and should only be used when performance requires it.
3. Surface Finish
Surface finish impacts both cost and reliability:
HASL (Hot Air Solder Leveling): most economical, suitable for general designs
ENIG: higher cost but better for fine-pitch components, edge connectors, and long-term reliability
For cost-sensitive projects, HASL is often sufficient unless your design has specific soldering or precision requirements
Related Reading: HASL vs ENIG: Which PCB Surface Finish Should You Choose in 2026?
4. Via Technology
Standard through-hole vias are the most economical. Advanced via structures such as blind/buried vias, microvias, or via-in-pad designs increase manufacturing complexity and cost. Avoid via-in-pad and HDI features unless your component density truly demands them.
5. Lead Time
Production speed has a direct impact on cost. Standard lead times are generally much more affordable, while expedited manufacturing can significantly increase pricing. If your project timeline allows flexibility, choosing a standard production window is often the most cost-efficient approach.
What to Expect in PCB Assembly Cost
PCB assembly cost (PCBA) covers component procurement, paste stenciling, pick-and-place, reflow soldering, and inspection. For most projects, assembly costs more than bare board fabrication.
| Project Scale | Typical PCBA Cost | Key Driver |
|---|---|---|
| Prototype (1–5 pcs) | $30 – $500 | Minimum fees, manual handling |
| Small batch (10–50 pcs) | $200 – $2,000 | Setup amortization |
| Medium volume (100–500 pcs) | $1,000 – $10,000 | Component sourcing efficiency |
| High volume (1,000+ pcs) | $5,000+ | Yield, automation, BOM pricing |
The biggest variable in PCB assembly cost is components — they typically account for 50–70% of total PCBA spend. Through-hole components cost more to assemble than SMD because they require wave soldering or manual placement. Minimizing THT parts is one of the most effective ways to achieve cost-efficient PCB assembly.
How to Get Cost-Efficient PCB Assembly
Instead of focusing only on manufacturing price, real savings usually come from design and sourcing decisions made earlier in the process:
1. Optimize circuit layout early
A cleaner layout reduces routing complexity, minimizes unnecessary vias, and often avoids the need for extra layers or HDI structures.
2. Reduce layer count where possible
Many designs that start as 4-layer boards can be simplified to 2 layers with careful routing. This alone can significantly reduce both fabrication and assembly costs.
3. Use standard materials and finishes
For most applications, FR-4 material combined with HASL surface finish provides a reliable and cost-effective baseline without unnecessary premium costs.
4. Follow standard component and manufacturing specifications
Using commonly available component packages (such as 0402 or 0603) and standard footprints helps avoid special handling fees and improves sourcing efficiency.
5. Apply Design for Manufacturability (DFM) principles
A DFM-friendly design reduces production issues such as soldering defects, misalignment, or yield loss. Even small improvements here can prevent expensive rework later.
6. Reduce BOM complexity
Using fewer unique components simplifies procurement and often leads to better pricing from suppliers.
7. Keep assembly on one side when possible
Single-sided assembly reduces reflow cycles and generally lowers labor and processing costs.
Try Instant PCB Cost Calculation with PCBgogo
If you want a quick way to estimate your PCB fabrication cost, platforms like PCBgogo provide instant online quoting tools that help you compare options before production.
You can calculate your custom PCB cost in just a few steps:
Step 1: Select the PCB material type (e.g., FR-4, Rogers, aluminum) to define the base board category.
Step 2: Enter your board dimensions (length × width) and quantity, which are required for generating the quote.
Step 3: Configure optional manufacturing specifications such as layers, thickness, copper weight, and minimum hole size based on your design needs.
Step 4: Choose additional surface finish and service options (e.g., HASL, ENIG, solder mask color, PCB assembly), then click CALCULATE to submit and get your final quotation.
You can try it directly here:
This makes it easier to understand how different design choices affect pricing before committing to production.
Final Thoughts
Custom PCB cost is the result of dozens of small decisions — layer count, material, finish, component choices, and order timing. The engineers who achieve the best results aren't always those who find the cheapest manufacturer. They're the ones who design for manufacturability from the start, standardize their BOMs, and plan realistic lead times. Apply the strategies above and you can realistically reduce total PCB and assembly spend by 30–60% without compromising reliability.
FAQ: Custom PCB Cost & Assembly
1. What is the cheapest way to make a PCB?
The lowest-cost option is usually a 2-layer FR-4 board with HASL finish, standard components, and no advanced vias. Keeping the design simple and avoiding special materials also helps reduce cost.
2. Why does PCB cost drop in high-volume production?
Because setup costs (like tooling, stencil, and machine configuration) are spread across more units. Once production is automated, the per-unit cost decreases significantly.
3. What has the biggest impact on PCB assembly cost?
The BOM (components) is the main driver, often accounting for 50–70% of total cost. Complex or rare components also increase sourcing and handling expenses.
4. Is ENIG always necessary for PCB manufacturing?
No. ENIG is only needed for fine-pitch components, high reliability, or edge connectors. For most general designs, HASL is sufficient and more cost-effective.
5. How can I reduce PCB cost without affecting quality?
Focus on design optimization: reduce layer count, use standard materials, simplify BOM, and follow DFM guidelines. These changes usually cut cost without sacrificing performance.


