
How to Solder and Desolder SMD Components?
Soldering SMD components requires a temperature-controlled iron, the right flux, and steady hands. Desoldering safely depends on which component you're removing — a hot air station is the most versatile tool, but a soldering iron alone can handle many jobs. This guide walks through the tools, step-by-step methods, and common mistakes to avoid — whether you're working with small passives or fine-pitch ICs.
Tools you need for SMD soldering
Having the right tools makes the difference between clean joints and frustrating rework. Here's how to split them by experience level and task type.
Essential tools (for beginners)
A temperature-controlled iron is non-negotiable. Station-style irons with adjustable tips (like a Hakko FX-888D or a Weller WE1010) give you consistent heat and fast recovery. Set the temperature between 300–350°C for standard leaded solder, or 350–370°C for lead-free.
Use fine solder — 0.5 or 0.6 mm diameter — and always apply flux before soldering. Flux cleans the pad surface, improves solder flow, and reduces the chance of cold joints. A thin, pointed or chisel tip works best for 0603 and smaller passives.
Anti-static (ESD) tweezers let you place and hold components without risk of damage from static discharge. Curved-tip tweezers are the most versatile. A solder wick (desoldering braid) is used to remove excess solder and fix solder bridges. A PCB holder or third-hand clamp keeps the board steady — critical for precise work.
Advanced tools (for ICs and fine-pitch work)
A hot air rework station is essential for anything with bottom pads (QFN, BGA) and very useful for removing components without damaging the PCB. Look for a station with adjustable airflow and a range up to at least 450°C.
Solder paste with a stencil gives much more consistent results than hand-applying solder for IC pads. A stereo microscope or USB microscope (at least 10–40× magnification) is worth having if you regularly work with 0402 or smaller. For volume production, a reflow oven applies heat evenly across the whole board — far more reliable than hand reflow with a hot air gun.
How to solder SMD components step by step?
The technique varies by component type. Here are the three main scenarios you'll encounter.
How to hand solder common SMD passives (0402–1206)?
This covers resistors, capacitors, and inductors in the most common chip packages. The approach is the same regardless of size — just adjust your tip and the amount of solder.
Step 1: Apply flux
Apply a small amount of liquid flux to both pads. This improves wetting and prevents oxidation.
Step 2: Tin one pad
Add a small amount of solder to one pad only. You're creating an anchor point, not a full joint.
Step 3: Place and tack
Hold the component with tweezers. Reflow the tinned pad and slide the component into position. Release once the solder solidifies.
Step 4: Solder second end
Apply iron and solder to the free end. The joint should be shiny and concave — not a blob.
Step 5: Reflow first end
Touch the iron briefly to the tacked end to complete the joint and remove any cold-solder effect.
Step 6: Clean and inspect
Remove flux residue with isopropyl alcohol (IPA). Check both joints under magnification.
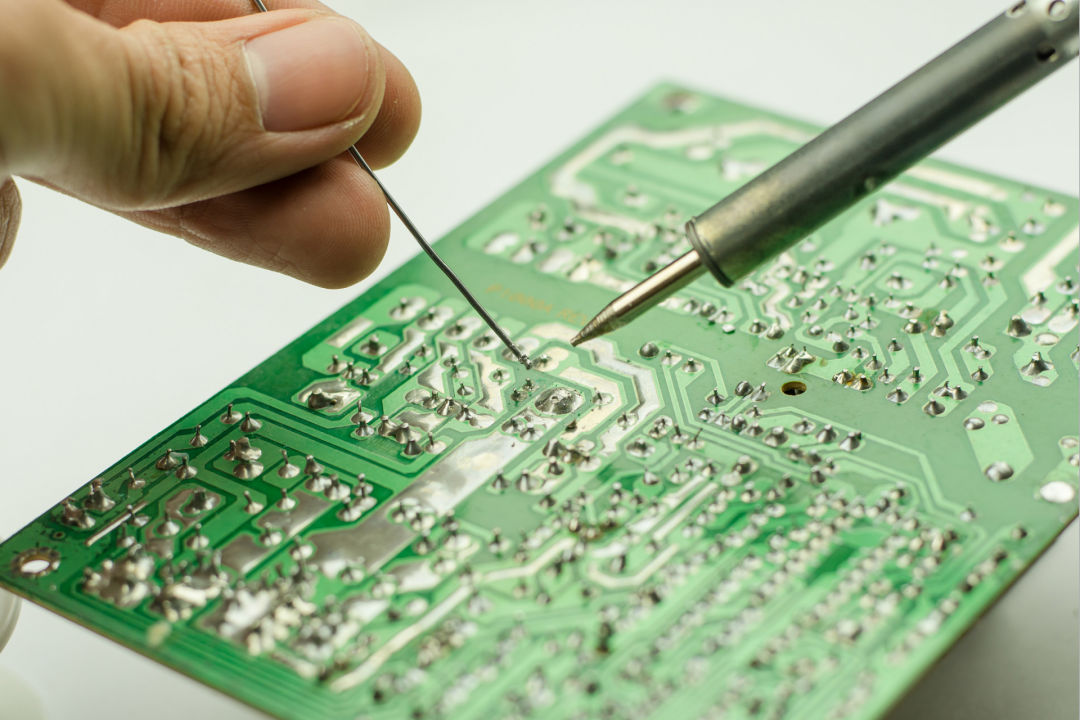
How to solder SMD ICs with gull-wing leads (SOP, QFP)?
Gull-wing ICs like SOP and QFP packages have visible leads extending from the sides, which makes them accessible with a regular iron. The drag soldering method is the most practical approach for multi-pin devices.
Apply flux liberally across all leads on one side. Good flux is the key to drag soldering — it keeps the solder flowing and prevents bridges from sticking.
Tack two diagonal corner pins to hold the IC in place. Check alignment carefully before continuing.
Load a small amount of solder onto a chisel or hoof tip. Drag slowly along the row of leads, maintaining light contact. The solder should wick onto each pin as you go.
Bridges are normal at this stage. Apply more flux and use solder wick to pull out excess. The wick absorbs solder cleanly when there's enough flux on the joint.
Repeat for each row. Clean with IPA and inspect under magnification.
How to solder bottom-contact ICs (QFN, LGA)?
QFN and LGA packages have pads on the bottom face with no visible leads. You can't reach them with a standard iron tip. Solder paste and reflow heat are the standard approach.
Apply solder paste to the PCB pads using a stencil, or dispense it carefully by hand for low-volume work. The paste amount matters — too much causes bridging under the exposed pad.
Place the IC carefully so the corner pads align with the PCB pads. Use a microscope or magnifier to verify alignment before reflow.
Reflow with a hot air station (around 200–230°C for SAC305 lead-free paste) using a focused nozzle. Move the nozzle slowly in small circles. The IC will self-align slightly as the paste melts — watch for this.
Inspect the edges of the package for any visible side-pad joints. Internal joints under the exposed pad cannot be verified visually — X-ray inspection is used in production environments.
How to desolder and remove SMD components without damage?
The goal when desoldering is to remove the component cleanly — without lifting pads, damaging nearby parts, or overheating the PCB laminate. The right method depends on what you're removing.
How to desolder small SMD passives (resistors, capacitors, diodes)?
The simplest method for 0402–1206 passives is a pair of heated tweezers that contact both ends simultaneously. Apply heat, wait for both joints to melt, then lift the component straight up.
If you only have a single iron, apply fresh solder and flux to both pads first — this lowers the melting point and makes both joints reflow more easily. Rapidly alternate between both ends until both are liquid, then lift. A hot air gun at around 300°C with low airflow also works well and is gentler on adjacent components.
How to desolder SMD ICs with a soldering iron?
For SOP and QFP packages, use the solder wick approach. Apply flux to all the leads on one row, then press the wick firmly against the leads with the iron. The wick absorbs the solder as it melts. Work methodically down each row.
Once all the pins are free of solder, reheat them row by row while gently lifting with tweezers. Don't force it — if a pin is still stuck, there's solder holding it. Never pry an IC off the board; pad damage is almost inevitable if you do.
How to desolder SMD components with hot air?
Set your hot air station to 350–380°C for leaded solder, or 380–420°C for lead-free. Use a focused nozzle that matches the IC footprint if available. Keep the airflow moderate — high airflow moves nearby components.
Move the nozzle slowly in small circles over the component. Watch for the solder to reflow — the IC will shift slightly when it's free. Use ESD tweezers to lift the component straight up the moment it releases. Don't try to lever it sideways.
Common SMD soldering defects and how to fix them?
Most defects come down to temperature, timing, or the amount of solder or flux. Here's a quick reference for the problems you'll encounter most often.
SMD soldering safety tips
Soldering is a low-risk activity if you follow basic precautions. These apply whether you're doing a quick repair or a long session at the bench.
Always work in a ventilated space or use a fume extractor positioned close to the work area. Flux fumes — particularly from no-clean and rosin-based fluxes — are respiratory irritants with extended exposure.
Wear an ESD wrist strap connected to ground when handling bare PCBs and components. Static discharge can damage ICs without leaving any visible sign of failure. An ESD mat adds a second layer of protection.
Keep your iron in its holder when you're not actively soldering. A 350°C tip left resting on a bench is a burn and fire hazard. Tin the tip with a small amount of solder before storing it—this protects the tip surface from oxidation.
If you use leaded (tin-lead) solder, wash your hands before eating or touching your face. Keep food and drinks away from the work area. Lead-free solder (SAC305 or similar) requires higher temperatures — typically 50°C more than leaded — so check your iron settings when switching between the two.
Conclusion
Soldering and desoldering SMD components is a learnable skill that gets easier with the right tools and a consistent approach. For passives, mastering the tack-and-flow technique covers most hand-soldering jobs. For gull-wing ICs, drag soldering with good flux is reliable and fast. For bottom-contact packages like QFN, solder paste and controlled heat are the only practical options.
When desoldering, matching the method to the package type protects the board and the component. A hot air station is the most versatile tool for removal, but a soldering iron and wick alone can handle SOP and QFP removal cleanly if used correctly.
Defects like bridges, cold joints, and tombstoning all have straightforward fixes once you know what caused them. Most come down to temperature control, flux application, and not rushing the process.
PCBGOGO provides professional PCB manufacturing, SMD component sourcing, and full one-stop PCBA assembly services. Their online instant quoting tool lets you get accurate pricing in seconds — no email required. Whether you need a small prototype run or volume production, PCBGOGO handles the full build from bare board to finished assembly.
FAQs about SMD soldering and desoldering
Can I desolder SMD components with just a soldering iron?
Yes, for many components. Small passives (0603 and larger) can be removed by reflowing both pads rapidly with a single iron. Gull-wing ICs like SOP can be desoldered using solder wick to remove all the pin solder, then lifting the IC once the pins are clear. Bottom-contact packages (QFN, BGA) genuinely require hot air — a soldering iron can't reach the pads underneath the package.
How do I remove an SMD component without a hot air gun?
For passives: alternate the iron rapidly between both ends until both joints are liquid, then lift. Adding a little fresh solder and flux to both pads first lowers the melting point and speeds this up. For SOP/QFP ICs: apply flux and use solder wick to clear all the pins, then slide a thin blade (like a hobby knife blade) gently under the IC while heating one row at a time. It takes patience but it works.
How do I replace a damaged SMD component?
Remove the old component using the appropriate method, then clean the pads with flux and solder wick to remove residue. Inspect the pads under magnification — if any pad is lifted or missing, it needs to be repaired before fitting the replacement. Tin the pads lightly, align the new component, and solder using the standard technique for that package type. Always clean the board with IPA after reworking.


